This is the first part of a short series on realizing pre-rendered backgrounds with live-rendered 3D objects in the foreground, that are composited into the image correctly at runtime. Many of my favourite adventure games, including my all-time favourite The Longest Journey as well as Grim Fandango use this technique to give their backgrounds a refined look which can be adapted very well by artists while keeping the power of animating 3D characters. The following video from The Longest Journey shows the advantage nicely: the background has a lot of detail, while the characters in the foreground are less detailed (keep in mind that this game came out in 1999, and graphics cards wouldn’t have been able to create this level of detail at that time).
The basic idea is to make sure that we have the same camera setting in the rendering tool and in the game engine, so that objects match up in perspective. Then, the next task is to render the realtime 3D objects into the pre-rendered image so that they are occluded by the pre-rendered objects that are infront of them.
The two tools I will be using are Blender (version 2.71) and Unity. The first part of this post deals with getting the camera position right so that our character will actually be appearing on the image where it should. For this, we have a look at the settings that influence our camera. The second part is about the actual compositing in Unity.
Blender
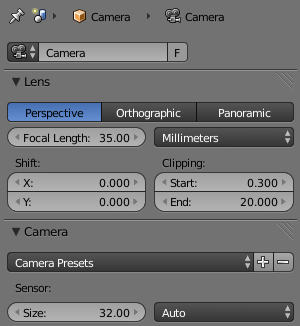
Camera settings in Blender
In Blender, we have mainly the position, rotation as well as the factors focal length and sensor size. Focal length is the real-world number assigned to lenses and defines the field of view of a camera. Sensor size used to be hard-coded to 32 in Blender and is still pre-set at this value. It correlates to the size of the image sensor of a camera.
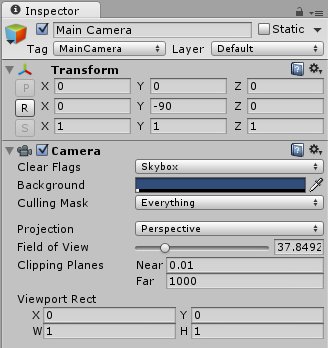
Unity
In Unity, we have again the position, rotation, but in this case only the field of view.
The question now is how to find out the correct settings in Unity based on those in Blender. For the position and rotation, we can take a shortcut: Simply export our scene including the camera, and Unity will import an empty game object. (Take note to use the correct scale settings on import/export. If you don’t change the settings during the FBX export in Blender, change the scale in Blender from 0.01 to 1 in the import settings.) Parent the Unity camera to this game object, reset its position and rotation and insert -90 degrees rotation around the Y-axis. Then the camera has the same position and orientation as in Blender.
Now for the field of view. I have found the correct formula for this in this Unity forum thread (credits to the user “mountainstorm”):
FoV (unity) = 2 atan(16 / (AspectRatio * FocalLength (blender in mm)))
Note that it doesn’t account for the sensor size, which seems to be fine at 32. Just don’t change it or figure out how to adapt the formula ;-)
For testing purposes, I rendered my original test scene once in Blender and Unity at the same size, which led to an overlapping image – an exact match :-) For correctly sizing the quad, please see this resource.

Left: Blender rendering, right: Unity rendering
The second part of this post deals with how to export depth along with a rendered image in Blender and how to use this data in Unity to composit the whole image at runtime.
You can find the source code for the demo on my github page.